Help Guide

Booking and admin help, one step at a time.

Choose what you want to do, follow the numbered steps, and compare your screen with the examples. No technical knowledge is needed.

Start here

Choose the guide that matches your task

Customers can book without an account. Staff members need an active admin account and will only see the pages allowed for their role.

Customer guide

Book one or more courts

Have the booking name, email address, phone number, preferred date, and player count ready before you begin.

1

Choose the date and courts

  1. Open the Book Now page.
  2. Choose the date. Past dates cannot be selected.
  3. Use Sport and Courts to shorten the schedule. Leave them on All Sports and All Courts if you want every option.
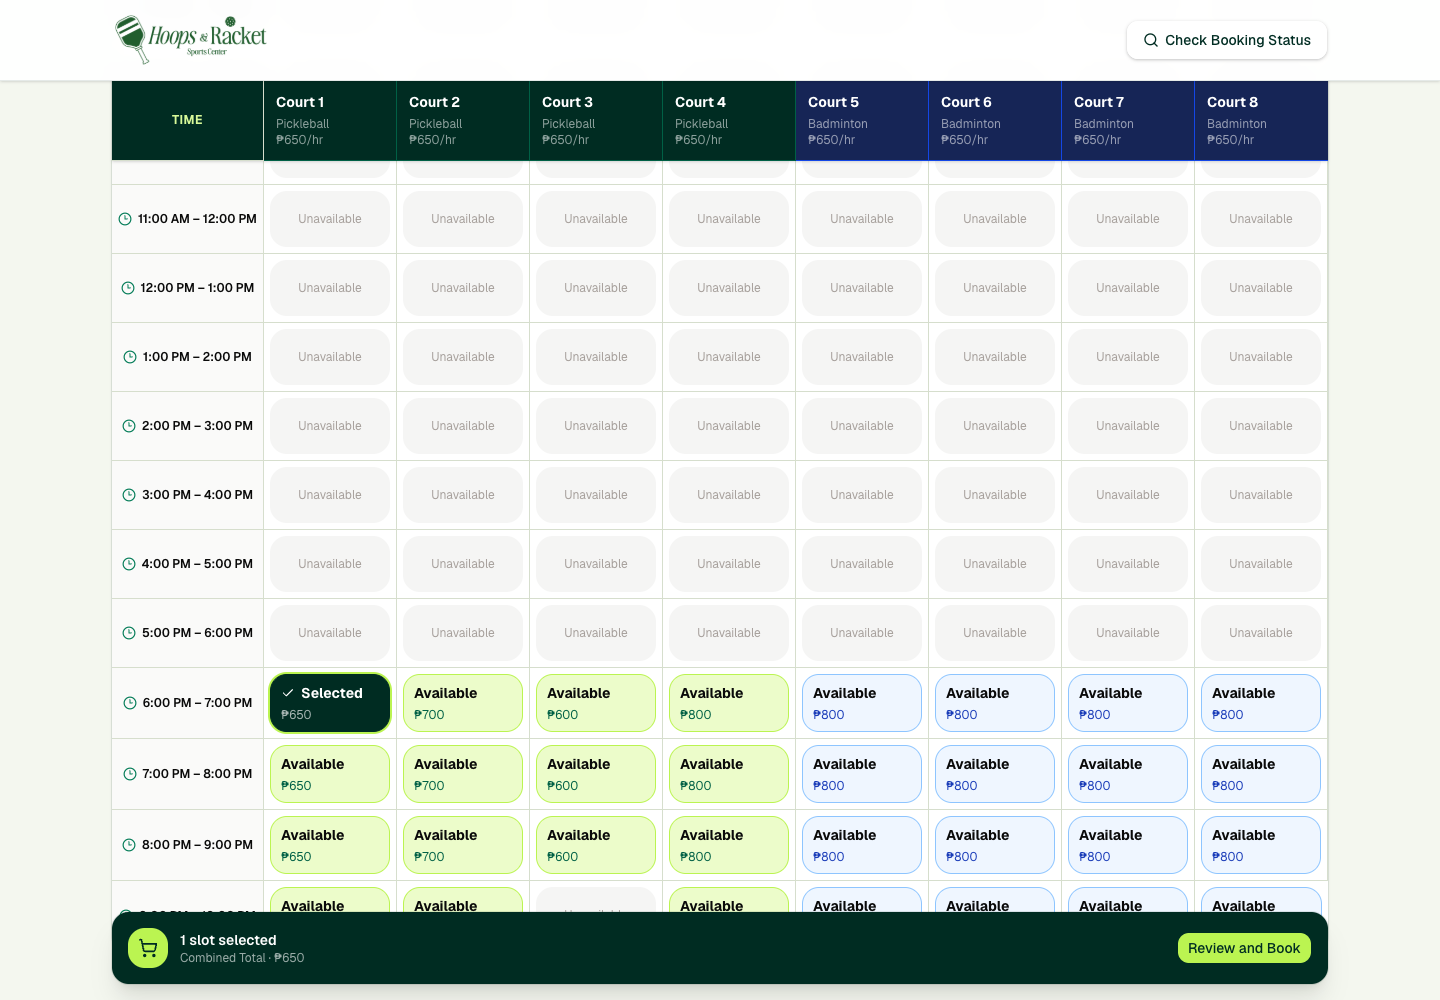
  4. Read across the schedule: each column is a court, and each row is a time period.
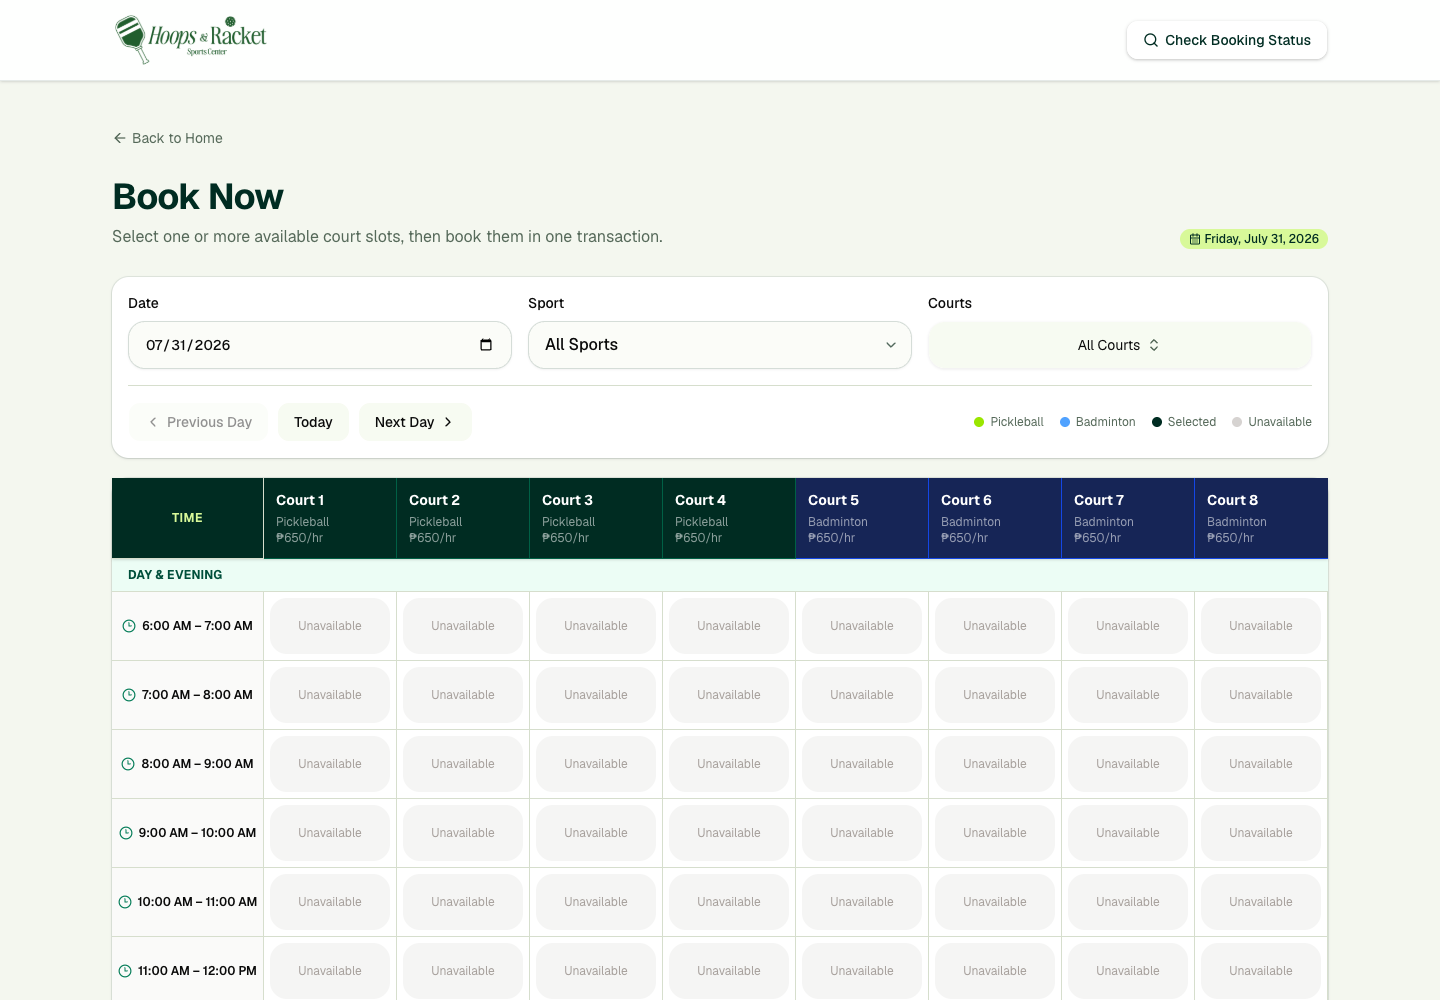
Book Now page showing the date, sport, and court filters above the availability schedule
Use the three filters above the schedule to find the right court faster. Select the image to open it full size.
2

Select the available times

  1. Select an Available box for the court and time you want.
  2. The box changes to Selected. Select more boxes if you want several courts or time periods in one order.
  3. Check the number of selected slots and the combined total, then select Review and Book.

An Unavailable box cannot be booked. Try another time, court, or date.

Court schedule with an available time selected and the Review and Book button visible
Selected times are highlighted and collected in the booking summary. Select the image to open it full size.
3

Review and continue to payment

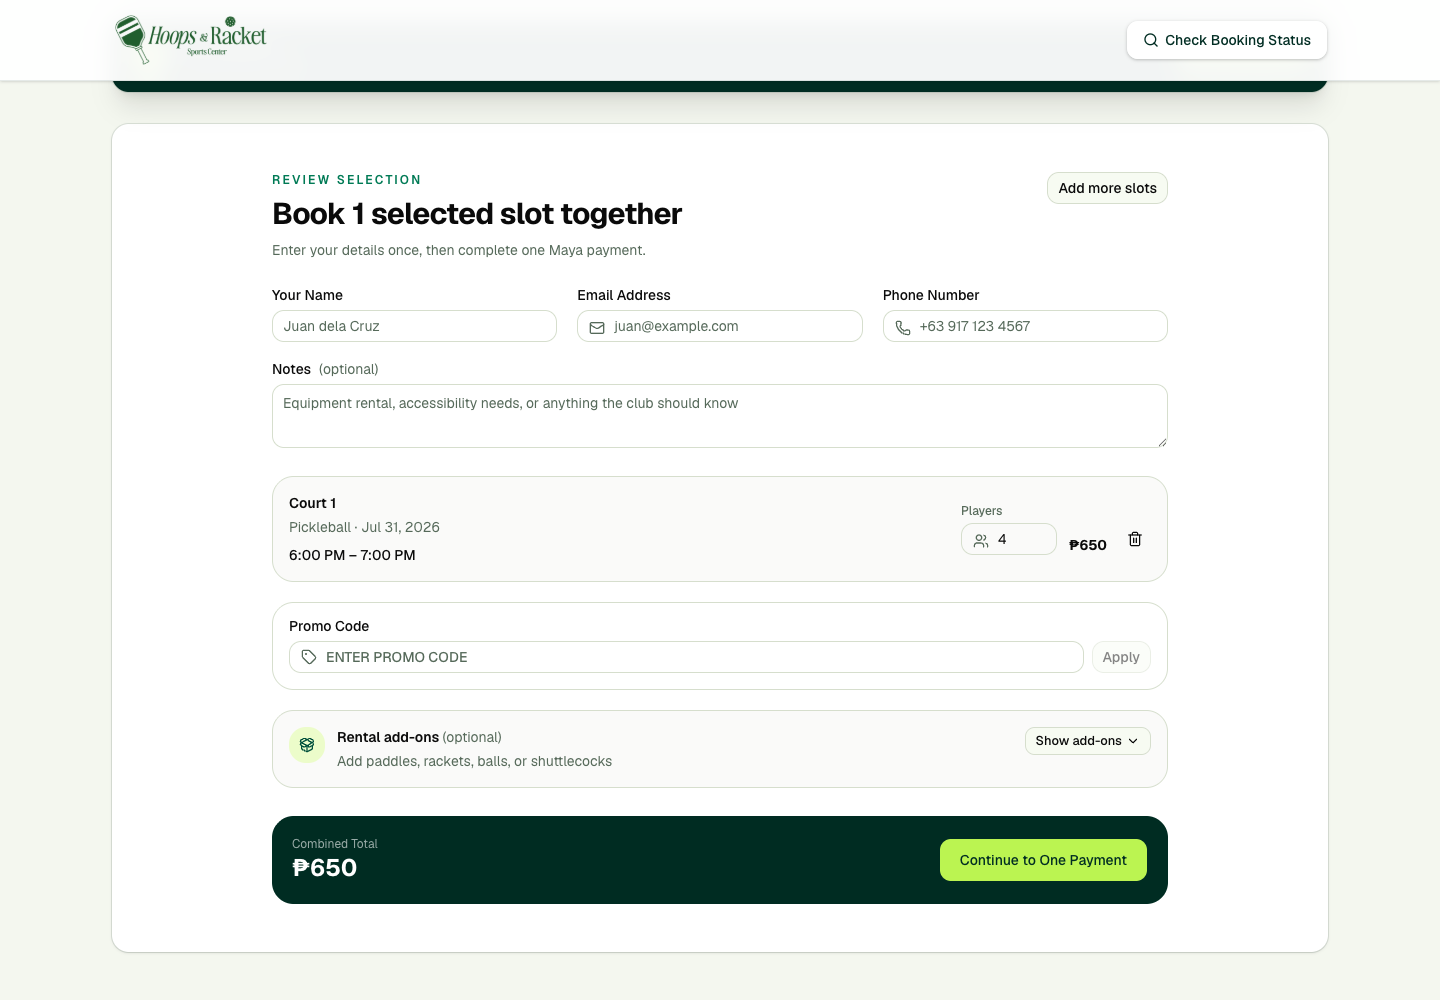
  1. Enter the customer's name, email address, phone number, and optional note.
  2. Confirm every court, date, time, player count, and price.
  3. Apply a promo code or add rental equipment when those options are available.
  4. Select Continue to One Payment. Complete payment on the Maya-hosted page, then wait for the Hoops & Racket confirmation page.
  5. Save the transaction reference and download the QR pass. The same pass covers every court in the order.

Hoops & Racket does not ask for card numbers, CVVs, OTPs, or bank passwords. Payment details are entered only on the provider's hosted checkout page.

Booking review form showing customer details, selected court, promo code, rental add-ons, and total
Review the full order before continuing to the single payment. Select the image to open it full size.

Customer guide

Check a booking and download the court pass

Use the exact email entered during booking. A reference by itself cannot reveal private booking details.

1

Retrieve the booking

  1. Open Check Booking Status.
  2. Enter the transaction reference or one booking reference from the confirmation.
  3. Enter the matching booking email, then select Check Booking.
2

Read the result

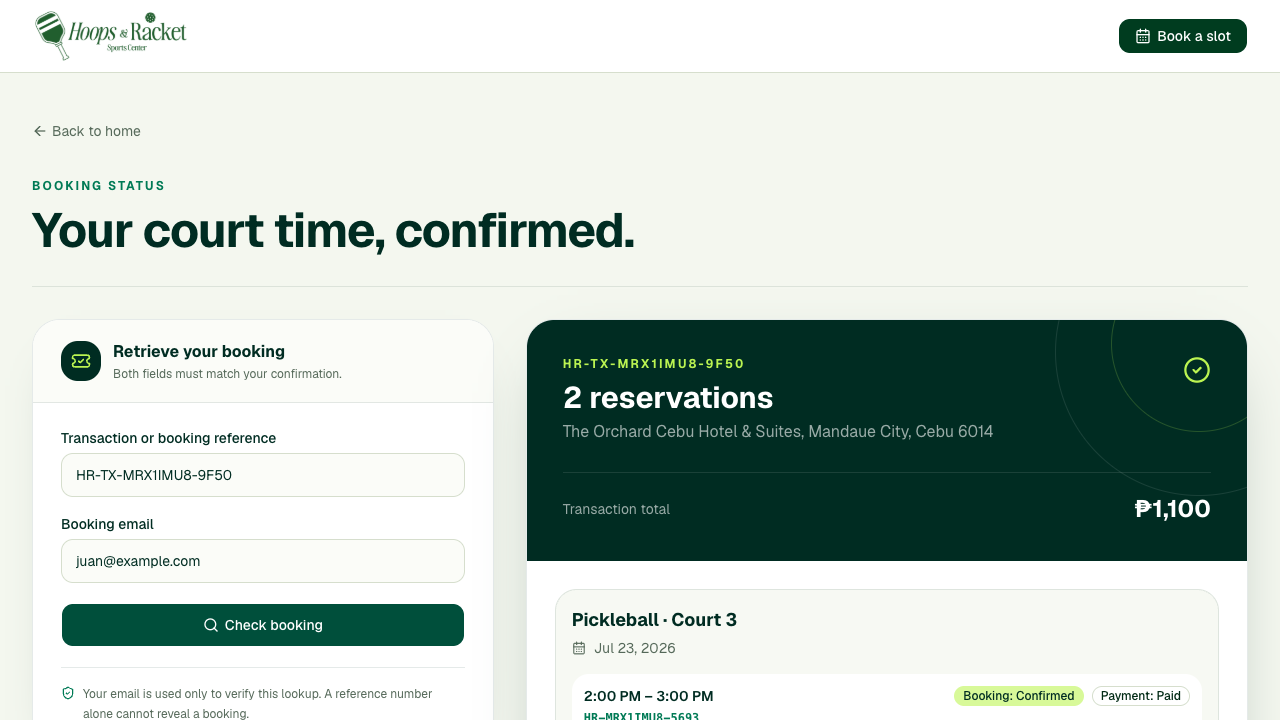
  1. Confirm the venue, total, court, date, time, and player count.
  2. Check Booking and Payment separately. A booking can be pending while payment is also pending.
  3. Select Download pass to save the QR code for check-in. If an active booking is unpaid, use the payment button shown on the page to start a fresh secure checkout.
Booking status result showing two confirmed paid reservations and one transaction QR pass
One result can contain several court reservations from the same transaction. Select the image to open it full size.

Booking status

Pending
Reserved while payment or staff review is pending.
Confirmed
The court reservation is confirmed.
Checked in
The customer has arrived and staff checked them in.
Completed
The court session is finished.
Cancelled
The reservation is no longer active.
No-show
The customer did not arrive for the reservation.

Payment status

Pending
Payment has not been confirmed yet.
Paid
Payment succeeded and was recorded.
Failed
The payment attempt did not succeed.
Refunded
The recorded payment was refunded.
Not started
No payment record has been created.

Staff guide

Sign in to the admin workspace

Use only your own staff account. Contact an owner if you need an invitation, password reset, or additional access.

1

Open the staff sign-in

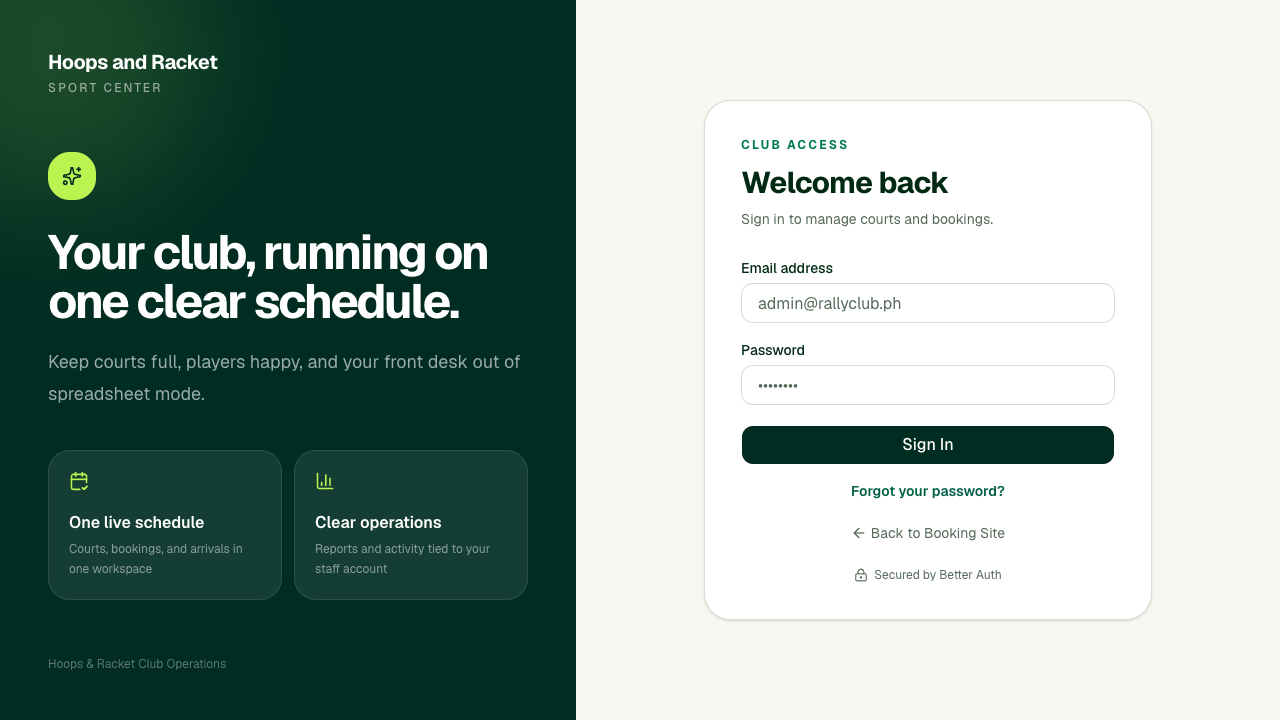
  1. Go to Admin Sign-in.
  2. Enter your staff email and password.
  3. Select Sign In. If two-factor authentication is enabled, enter the current authenticator code or a recovery code.
  4. Use Forgot your password? when you need a secure reset email. Do not share passwords between staff members.

Admin pages and action buttons follow your assigned role. View access lets you inspect information; Manage access also allows changes.

Hoops and Racket admin sign-in page with email and password fields
The admin sign-in is separate from the customer account sign-in. Select the image to open it full size.

Staff guide

Use every admin workspace

The left sidebar moves between workspaces. On smaller screens, select the menu button in the top-left corner first.

1

Overview

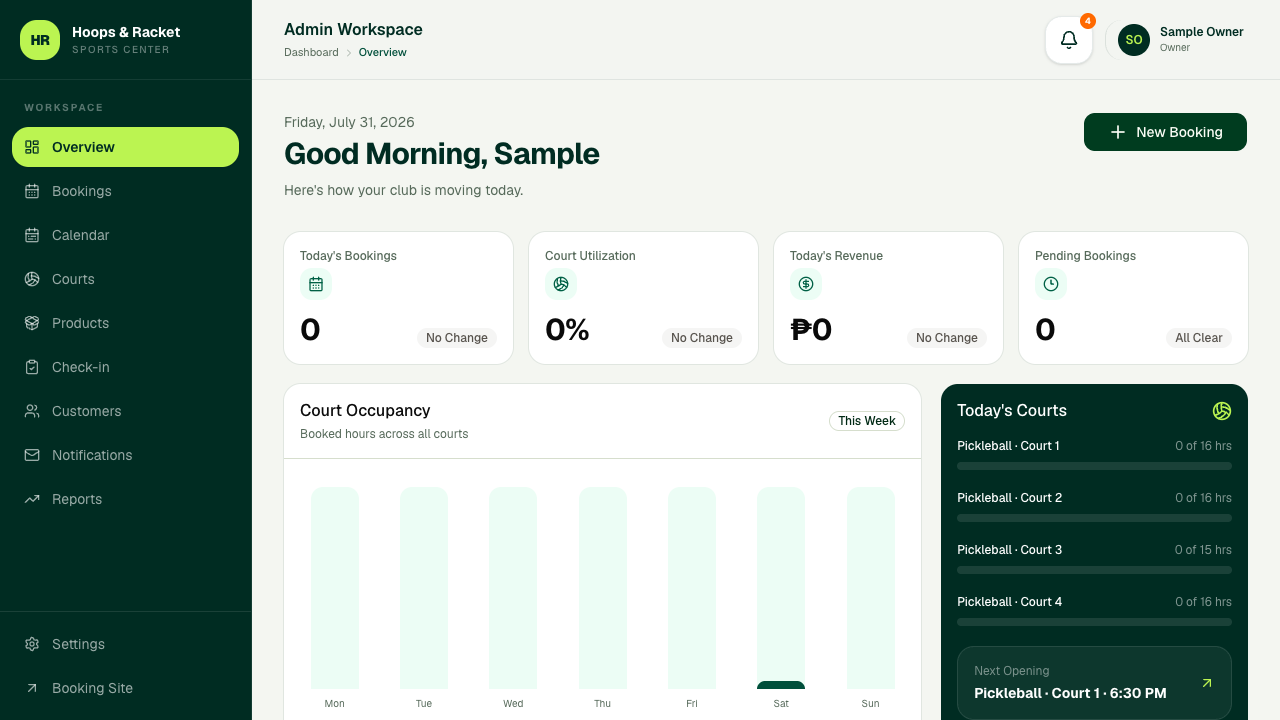
See today's bookings, court use, revenue, pending work, and the next available court at a glance.

  1. Review the four summary cards at the top of the page.
  2. Check Court Occupancy for the week's busiest days and Today's Courts for current usage.
  3. Use Upcoming Bookings to open the next reservation, or select New Booking to add a walk-in or phone booking.
Hoops and Racket admin Overview page
Use the Overview page from the admin sidebar. Select the image to open it full size.
2

Bookings

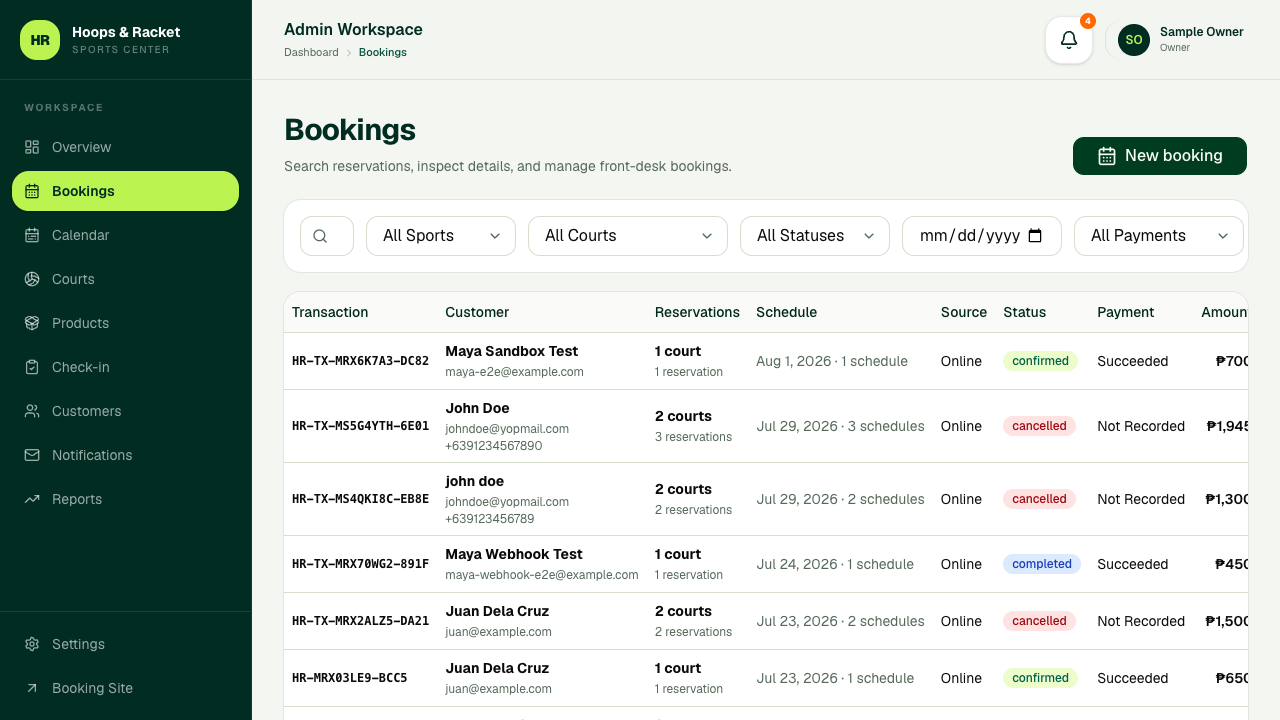
Find transactions, inspect every reservation in an order, and update booking or payment details.

  1. Search by reference, customer name, email, or phone number.
  2. Narrow the list by sport, court, booking status, date, or payment status.
  3. Select the arrow at the end of a row to open its details. From there, eligible staff can confirm, check in, complete, cancel, reschedule, record payment, add notes, or resend confirmation.
  4. Select New booking to create one or more reservations for a customer.
Hoops and Racket admin Bookings page
Use the Bookings page from the admin sidebar. Select the image to open it full size.
3

Calendar

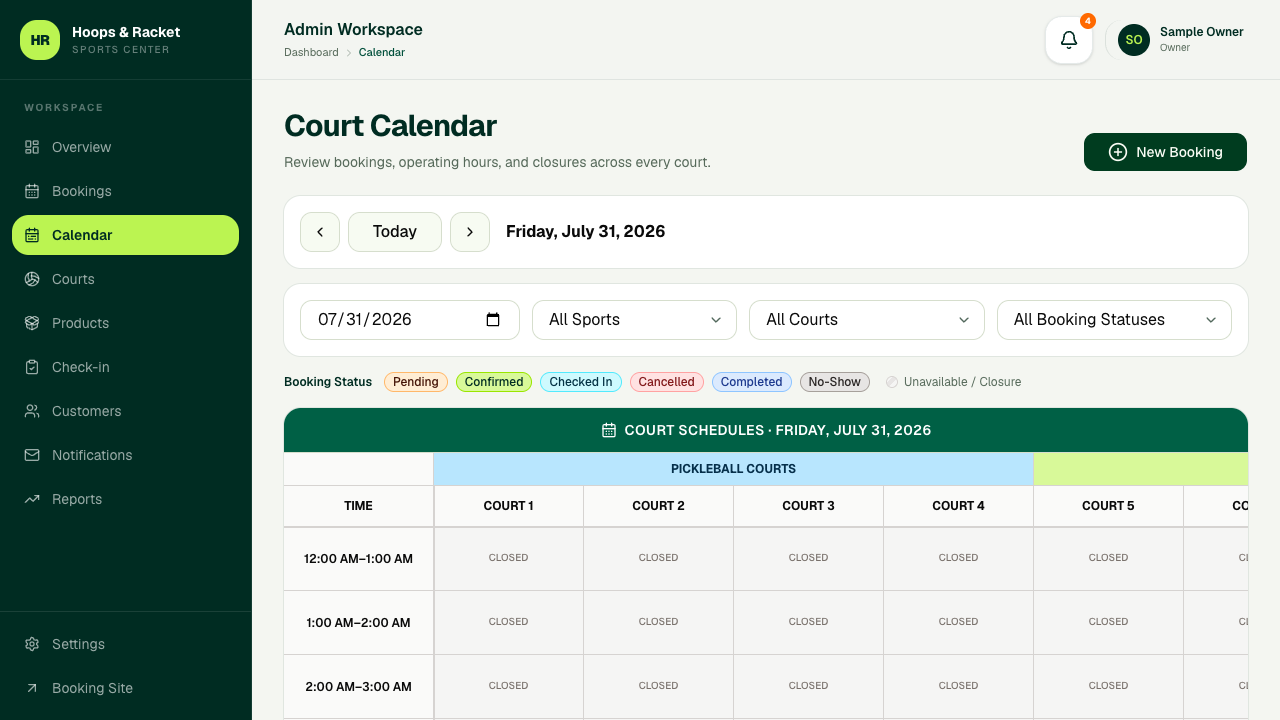
Work from a single-day court schedule, with each court in a column and each time period in a row.

  1. Choose the date, sport, court, or booking status you want to see.
  2. Select an existing booking to open and manage it.
  3. Select an available time to start a new booking with that court, date, and time already chosen.
  4. Use the closure action to block maintenance, a private event, or another unavailable period.
Hoops and Racket admin Calendar page
Use the Calendar page from the admin sidebar. Select the image to open it full size.
4

Courts

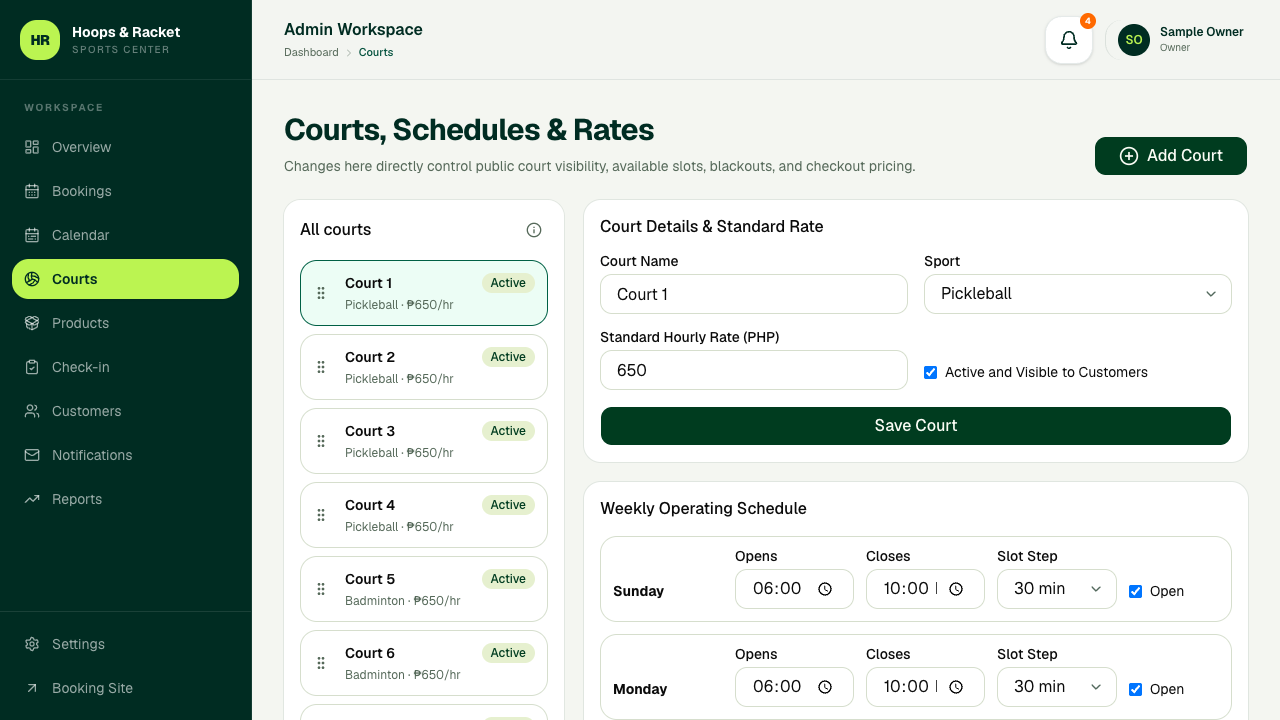
Manage the courts customers can book, their order, schedules, exceptions, closures, and rates.

  1. Select a court to edit its name, sport, standard rate, active status, or public visibility.
  2. Drag courts into the order customers should see, or use the keyboard move controls.
  3. Open Weekly Schedule for normal hours, Date Exceptions for special opening hours, Maintenance & Blackouts for closures, or Rate Rules for peak and weekend pricing.
  4. Review the confirmation carefully before applying a change to every court or permanently deleting a court.
Hoops and Racket admin Courts page
Use the Courts page from the admin sidebar. Select the image to open it full size.
5

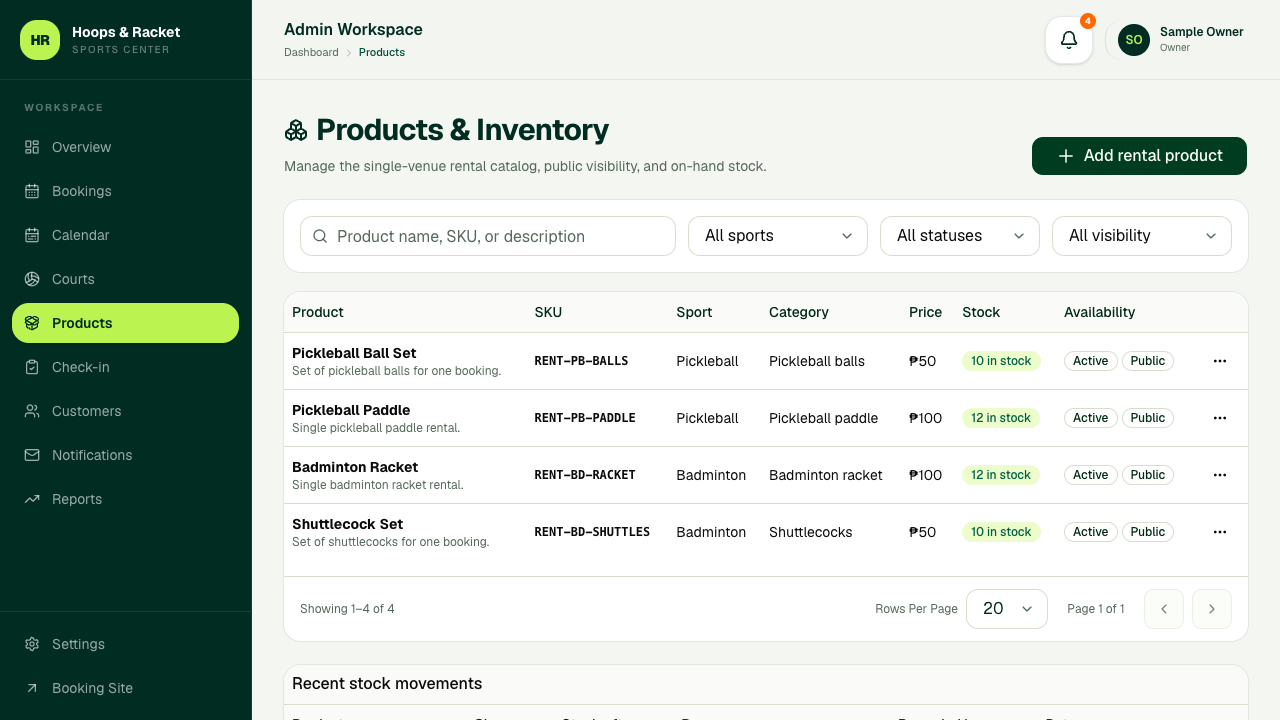
Products

Manage rental equipment, customer visibility, current stock, and stock movement history.

  1. Search by product name, SKU, or description, then filter by sport, status, or visibility.
  2. Select Add Product to create rental equipment, or open a product row to edit it.
  3. Use Adjust Stock whenever items are received, corrected, damaged, or lost. Always enter a clear reason.
  4. Review Movement History when you need to understand why the stock count changed.
Hoops and Racket admin Products page
Use the Products page from the admin sidebar. Select the image to open it full size.
6

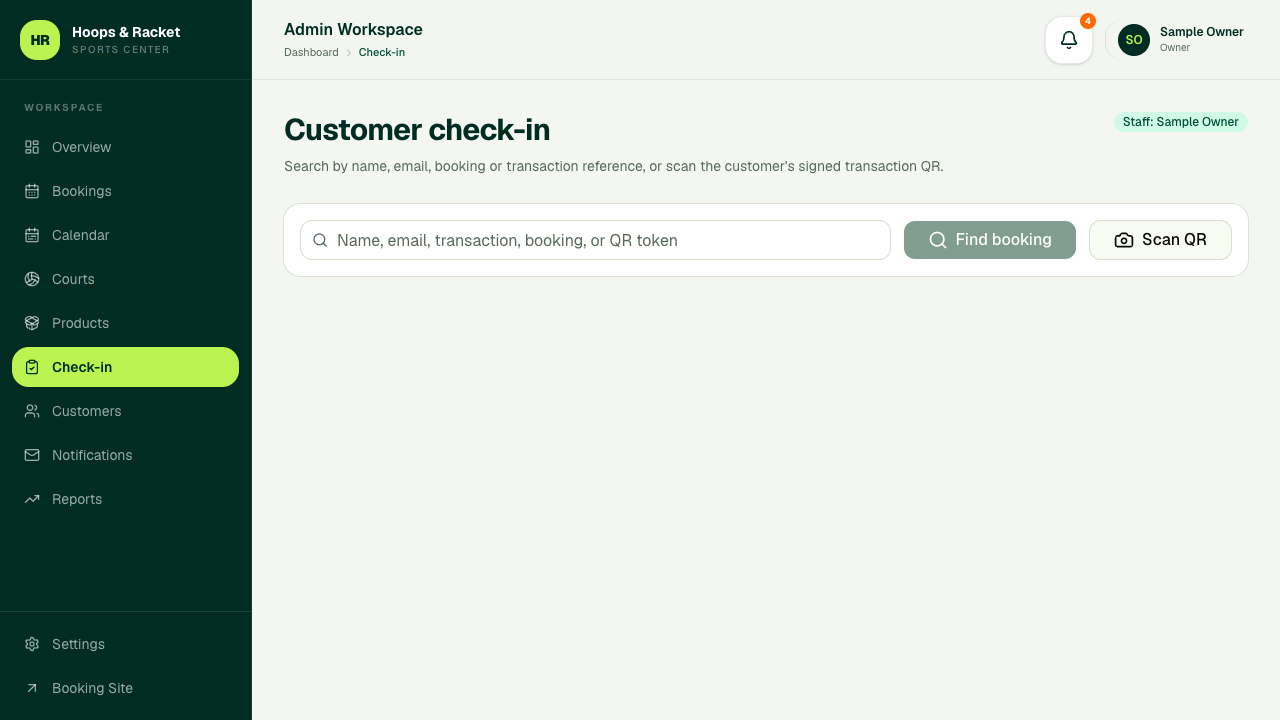
Check-in

Find an arriving customer by QR pass or reference and check in all eligible reservations together.

  1. Allow camera access and scan the customer's QR pass, or enter a reference manually.
  2. Confirm the customer, court, time, player count, booking status, and payment status.
  3. Select the reservations that have arrived, then confirm check-in.
  4. Stop and review any warning for an unpaid, early, late, cancelled, or already checked-in reservation.
Hoops and Racket admin Check-in page
Use the Check-in page from the admin sidebar. Select the image to open it full size.
7

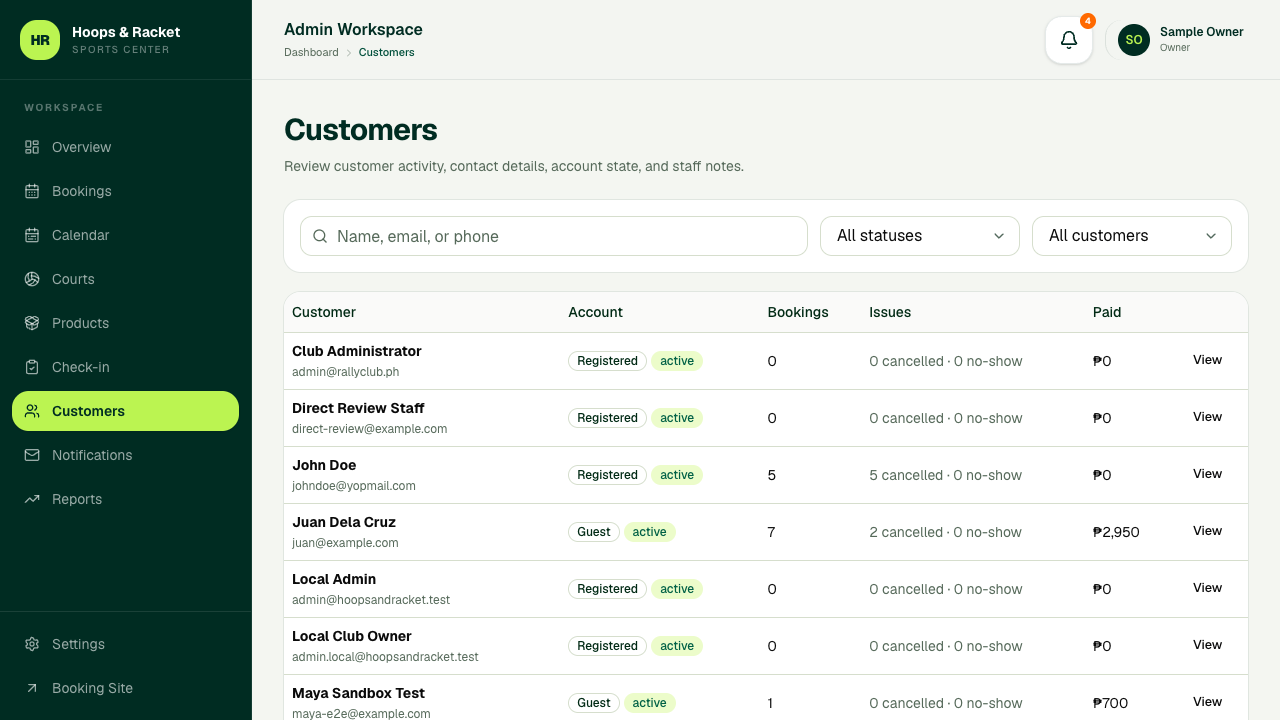
Customers

View registered customers and guests, including their contact details and booking history.

  1. Search by name, email, or phone, then filter by account or customer type.
  2. Open a customer to review upcoming bookings, history, totals, and payments.
  3. Eligible staff can update internal notes and active or suspended status.
  4. Use the invitation or password-reset action only after confirming the customer's email address.
Hoops and Racket admin Customers page
Use the Customers page from the admin sidebar. Select the image to open it full size.
8

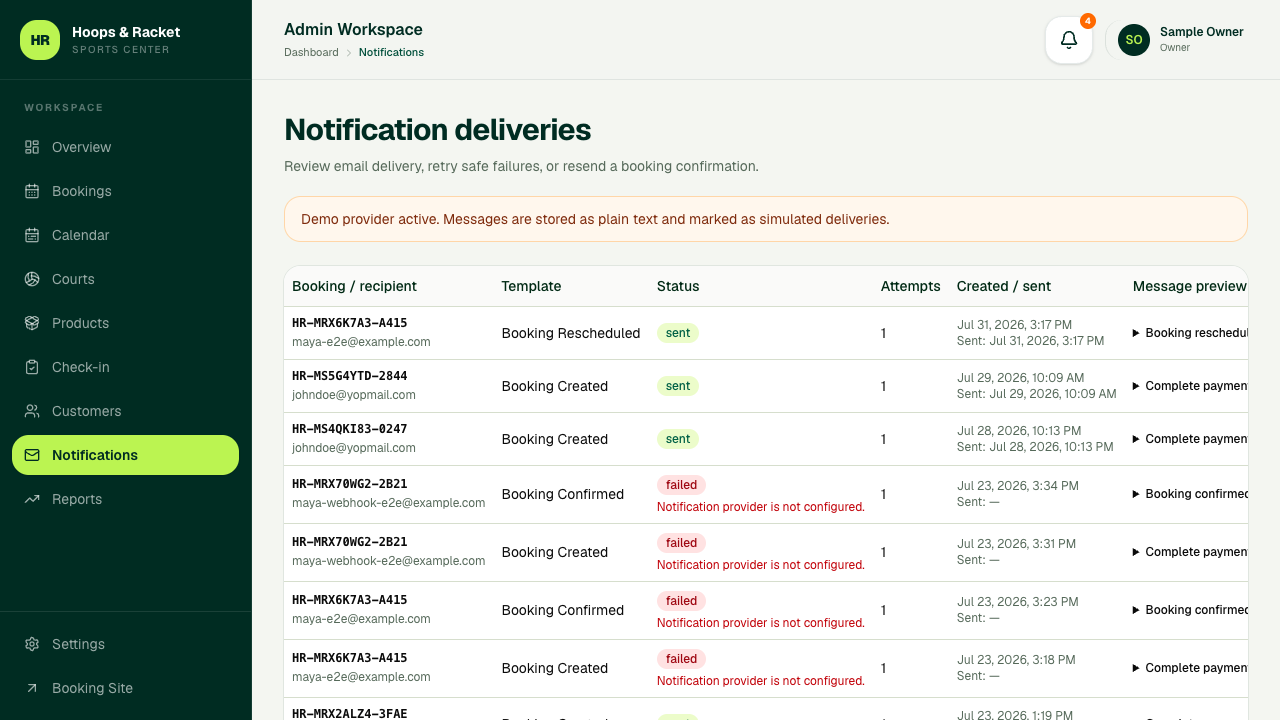
Notifications

Review booking and account messages sent by the system and retry failed deliveries safely.

  1. Filter the delivery list by recipient, message type, status, or date.
  2. Open a row to review its delivery time, attempts, and failure information.
  3. Retry only failed messages after checking that the recipient and event are correct.
  4. The bell in the admin header shows recent deliveries that need attention.
Hoops and Racket admin Notifications page
Use the Notifications page from the admin sidebar. Select the image to open it full size.
9

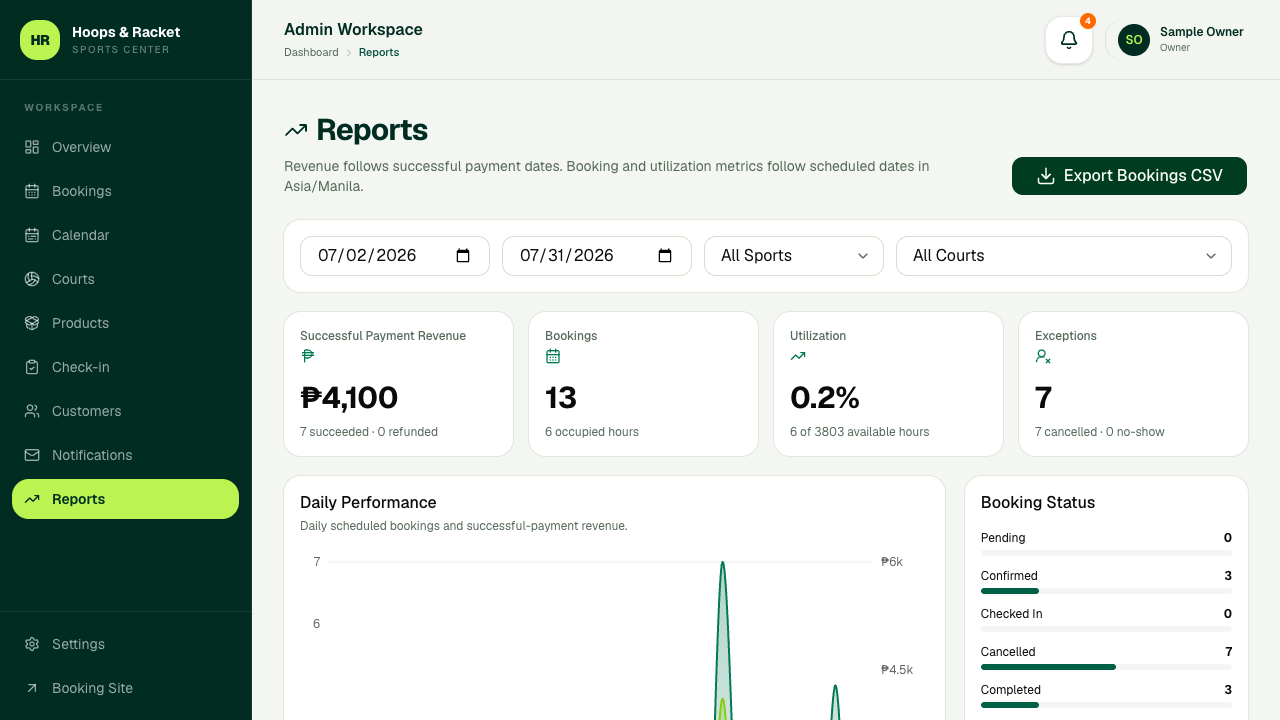
Reports

Review revenue, utilization, booking sources, cancellations, and no-shows for a chosen period.

  1. Choose the date range, then optionally limit the report to a sport or court.
  2. Review the summary cards and charts before comparing individual courts or sources.
  3. Select Export CSV when you need a spreadsheet copy of the report.
  4. Remember that revenue uses recorded successful payments, not every booking total.
Hoops and Racket admin Reports page
Use the Reports page from the admin sidebar. Select the image to open it full size.

Staff guide

Settings and your account

Settings control the club and staff team. Account Settings controls only your own profile, password, and two-factor authentication.

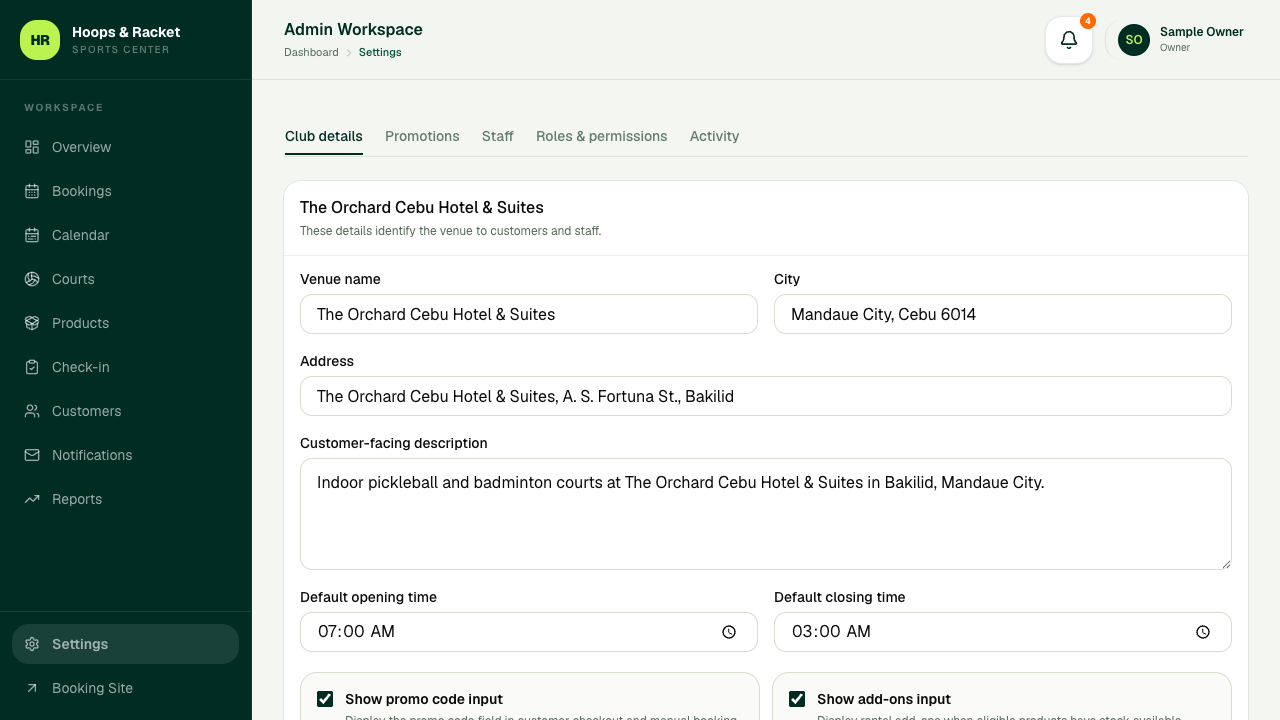
Settings: Club Details

  1. Update the venue name, address, city, customer description, and normal opening hours.
  2. Choose whether promo-code and rental add-on fields appear during booking.
  3. Select Save Changes and wait for the success message before leaving.
Admin Settings Club Details tab
The Club Details tab appears only for staff with the matching access. Select the image to open it full size.

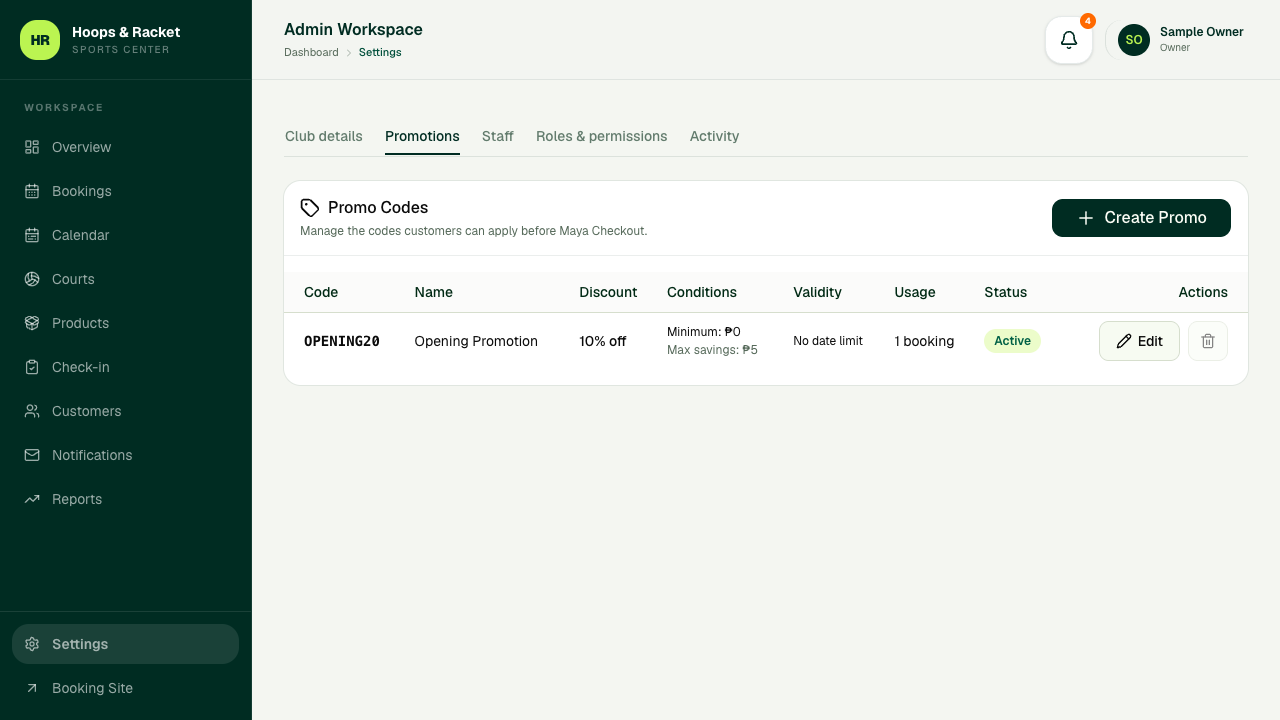
Settings: Promotions

  1. Create or edit percentage and fixed-amount promo codes.
  2. Set dates, minimum spend, maximum savings, and active status, then review usage before deleting a code.
Admin Settings Promotions tab
The Promotions tab appears only for staff with the matching access. Select the image to open it full size.

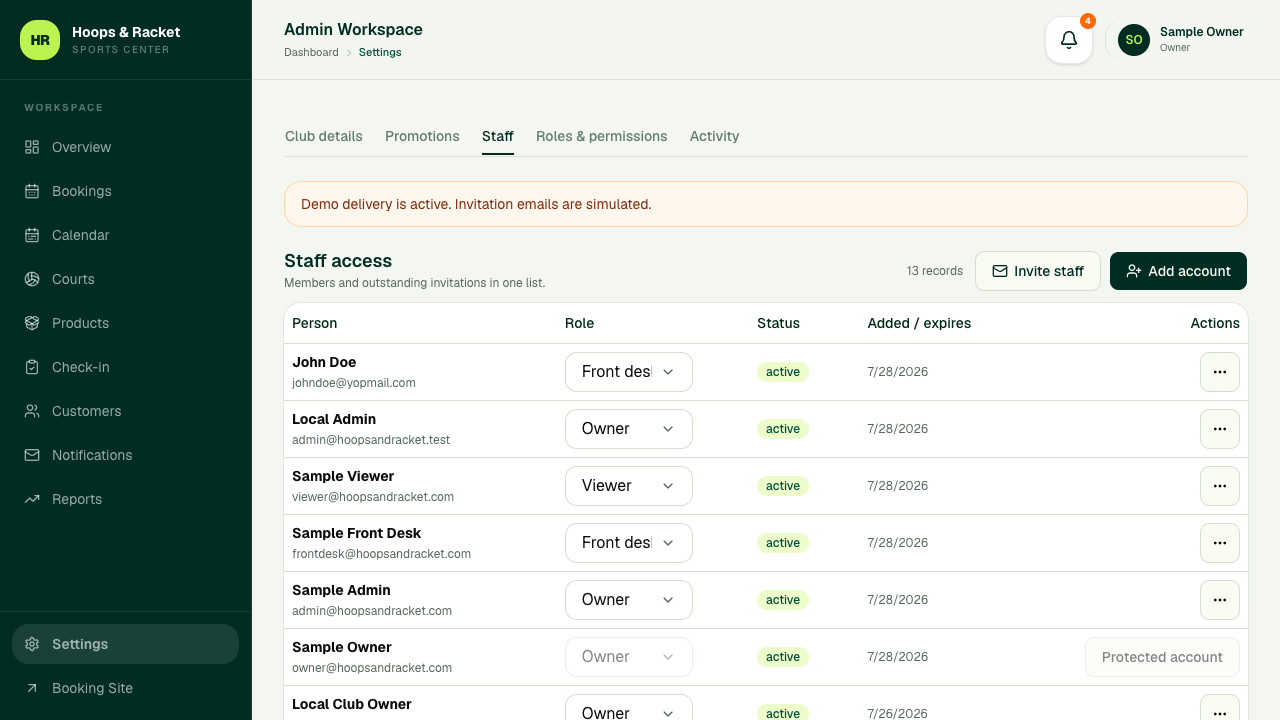
Settings: Staff

  1. Invite staff by email or create an account directly with an initial password.
  2. Change a member's role, revoke an invitation, remove club access, reset a password, or ban an account only after confirming the correct person.
Admin Settings Staff tab
The Staff tab appears only for staff with the matching access. Select the image to open it full size.

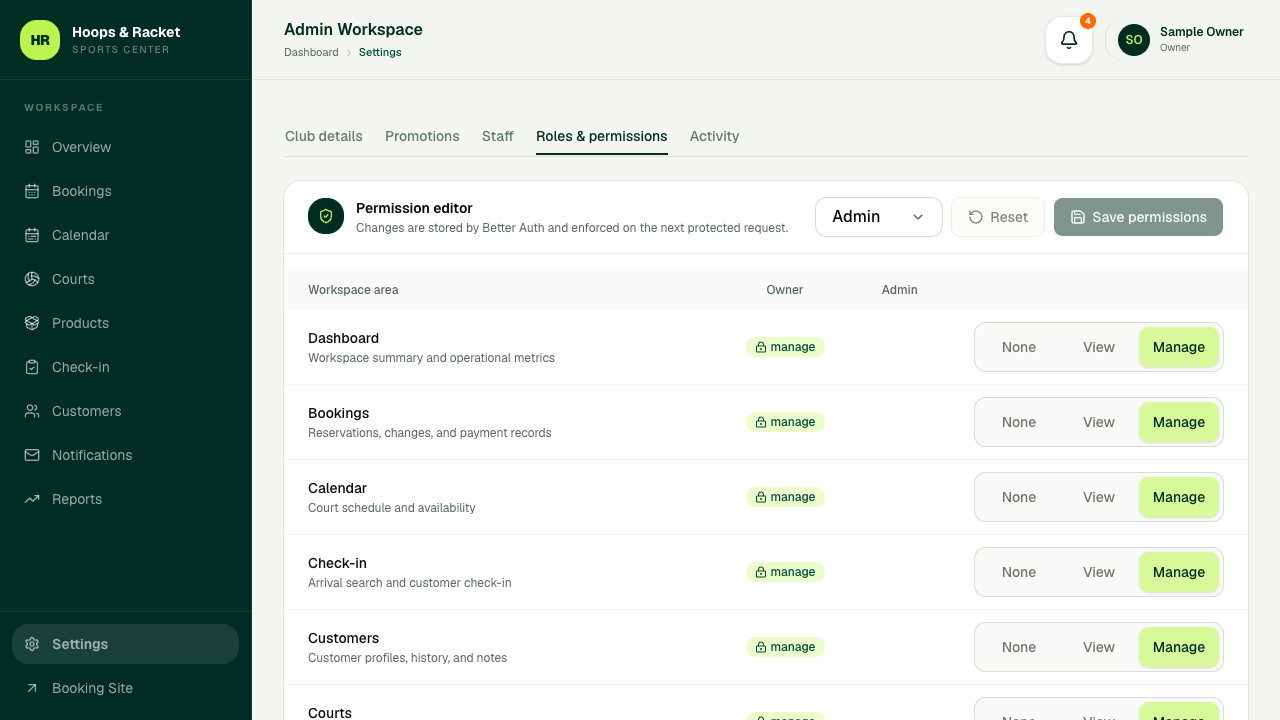
Settings: Roles & Permissions

  1. Choose Admin, Front Desk, or Viewer, then set each workspace to No Access, View, or Manage.
  2. Save the role and remember that the new access applies on the staff member's next protected action.
Admin Settings Roles & Permissions tab
The Roles & Permissions tab appears only for staff with the matching access. Select the image to open it full size.

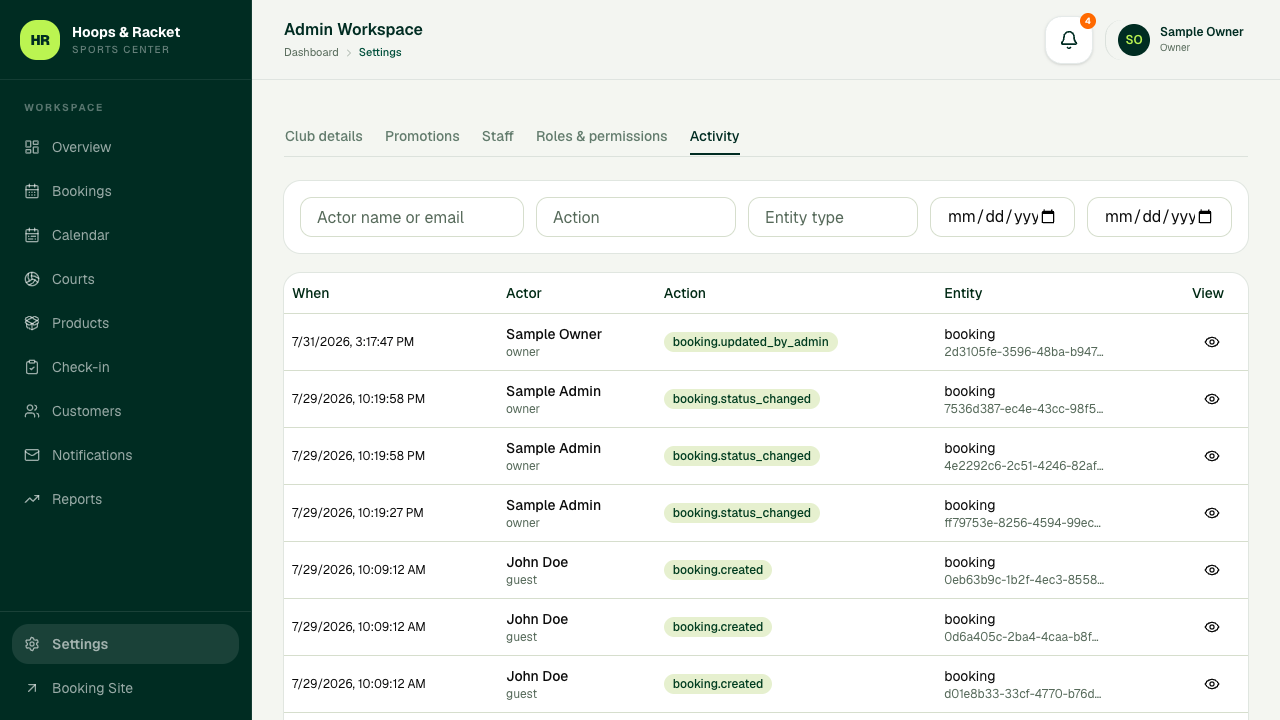
Settings: Activity

  1. Filter by staff member, action, record type, or date.
  2. Open an entry to review what changed and who performed the action. Activity records are for review and cannot be edited.
Admin Settings Activity tab
The Activity tab appears only for staff with the matching access. Select the image to open it full size.

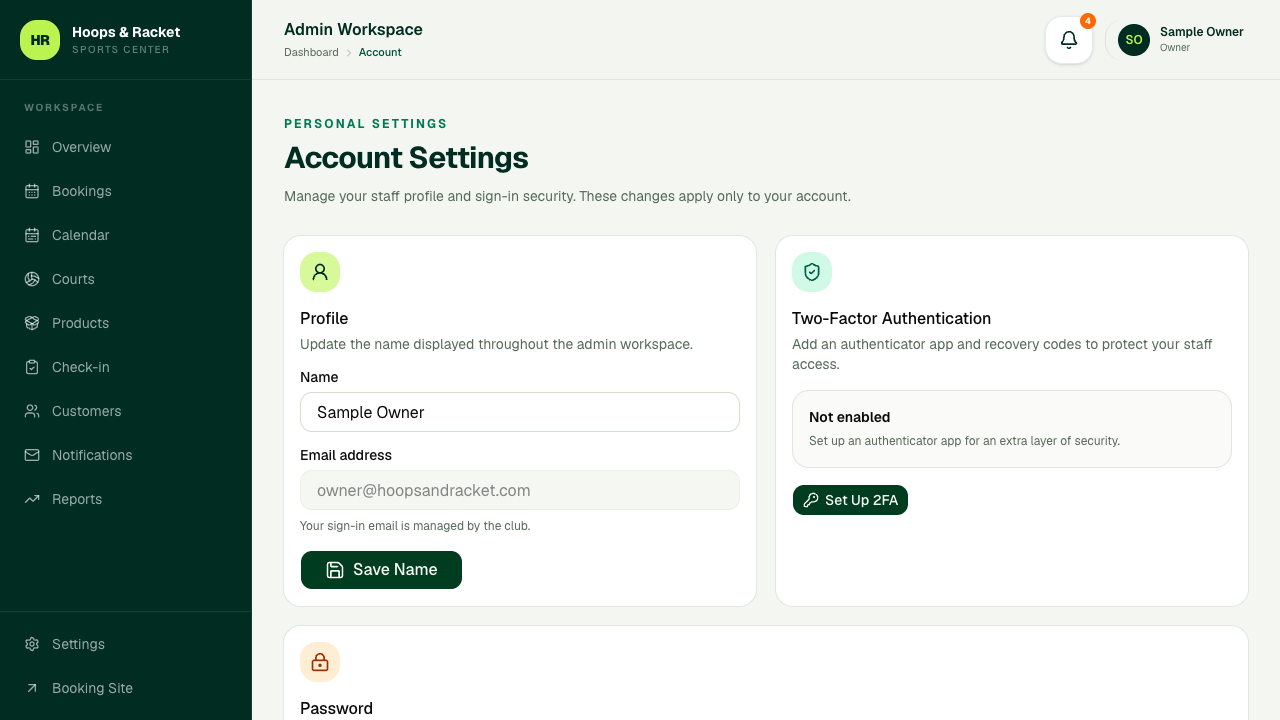
Account Settings

Open the avatar menu in the top-right corner and select Account Settings.

  1. Update your display name and save the change.
  2. Change your password using the current password. Other signed-in sessions are revoked for safety.
  3. Enable or manage two-factor authentication and store the recovery codes somewhere private and secure.
  4. Return to the avatar menu and select Log Out when using a shared front-desk computer.
Admin Account Settings page for profile name, password, and two-factor authentication
Account Settings applies to the currently signed-in staff member only. Select the image to open it full size.

Help

Common questions

Try these checks first. If the problem remains, give staff the booking reference and the exact message shown on screen.

Why can’t I select a court time?

The time is already booked, closed, outside operating hours, or temporarily held by another checkout. Choose another available time, court, or date.

Why can’t the booking be found?

Check the full reference and use the exact email entered during checkout. Both must belong to the same booking.

Payment succeeded, but the booking still looks pending.

Wait briefly, then check the booking again. Do not make a second payment unless the status page offers a new payment button. Contact staff if it stays pending.

Why is an admin button or page missing?

Your role may have view-only or no access to that workspace. Ask an owner to review Roles & Permissions; signing out and back in can also refresh changed access.

The QR scanner cannot use the camera.

Allow camera access in the browser and use a supported device. You can always enter the transaction or booking reference manually.

Can a cancelled paid booking be refunded here?

Cancellation does not automatically refund a payment. Staff must review and complete the refund through the approved payment process.

Ready to continue?

Return to booking or check an existing reservation.